
 Regina Wang
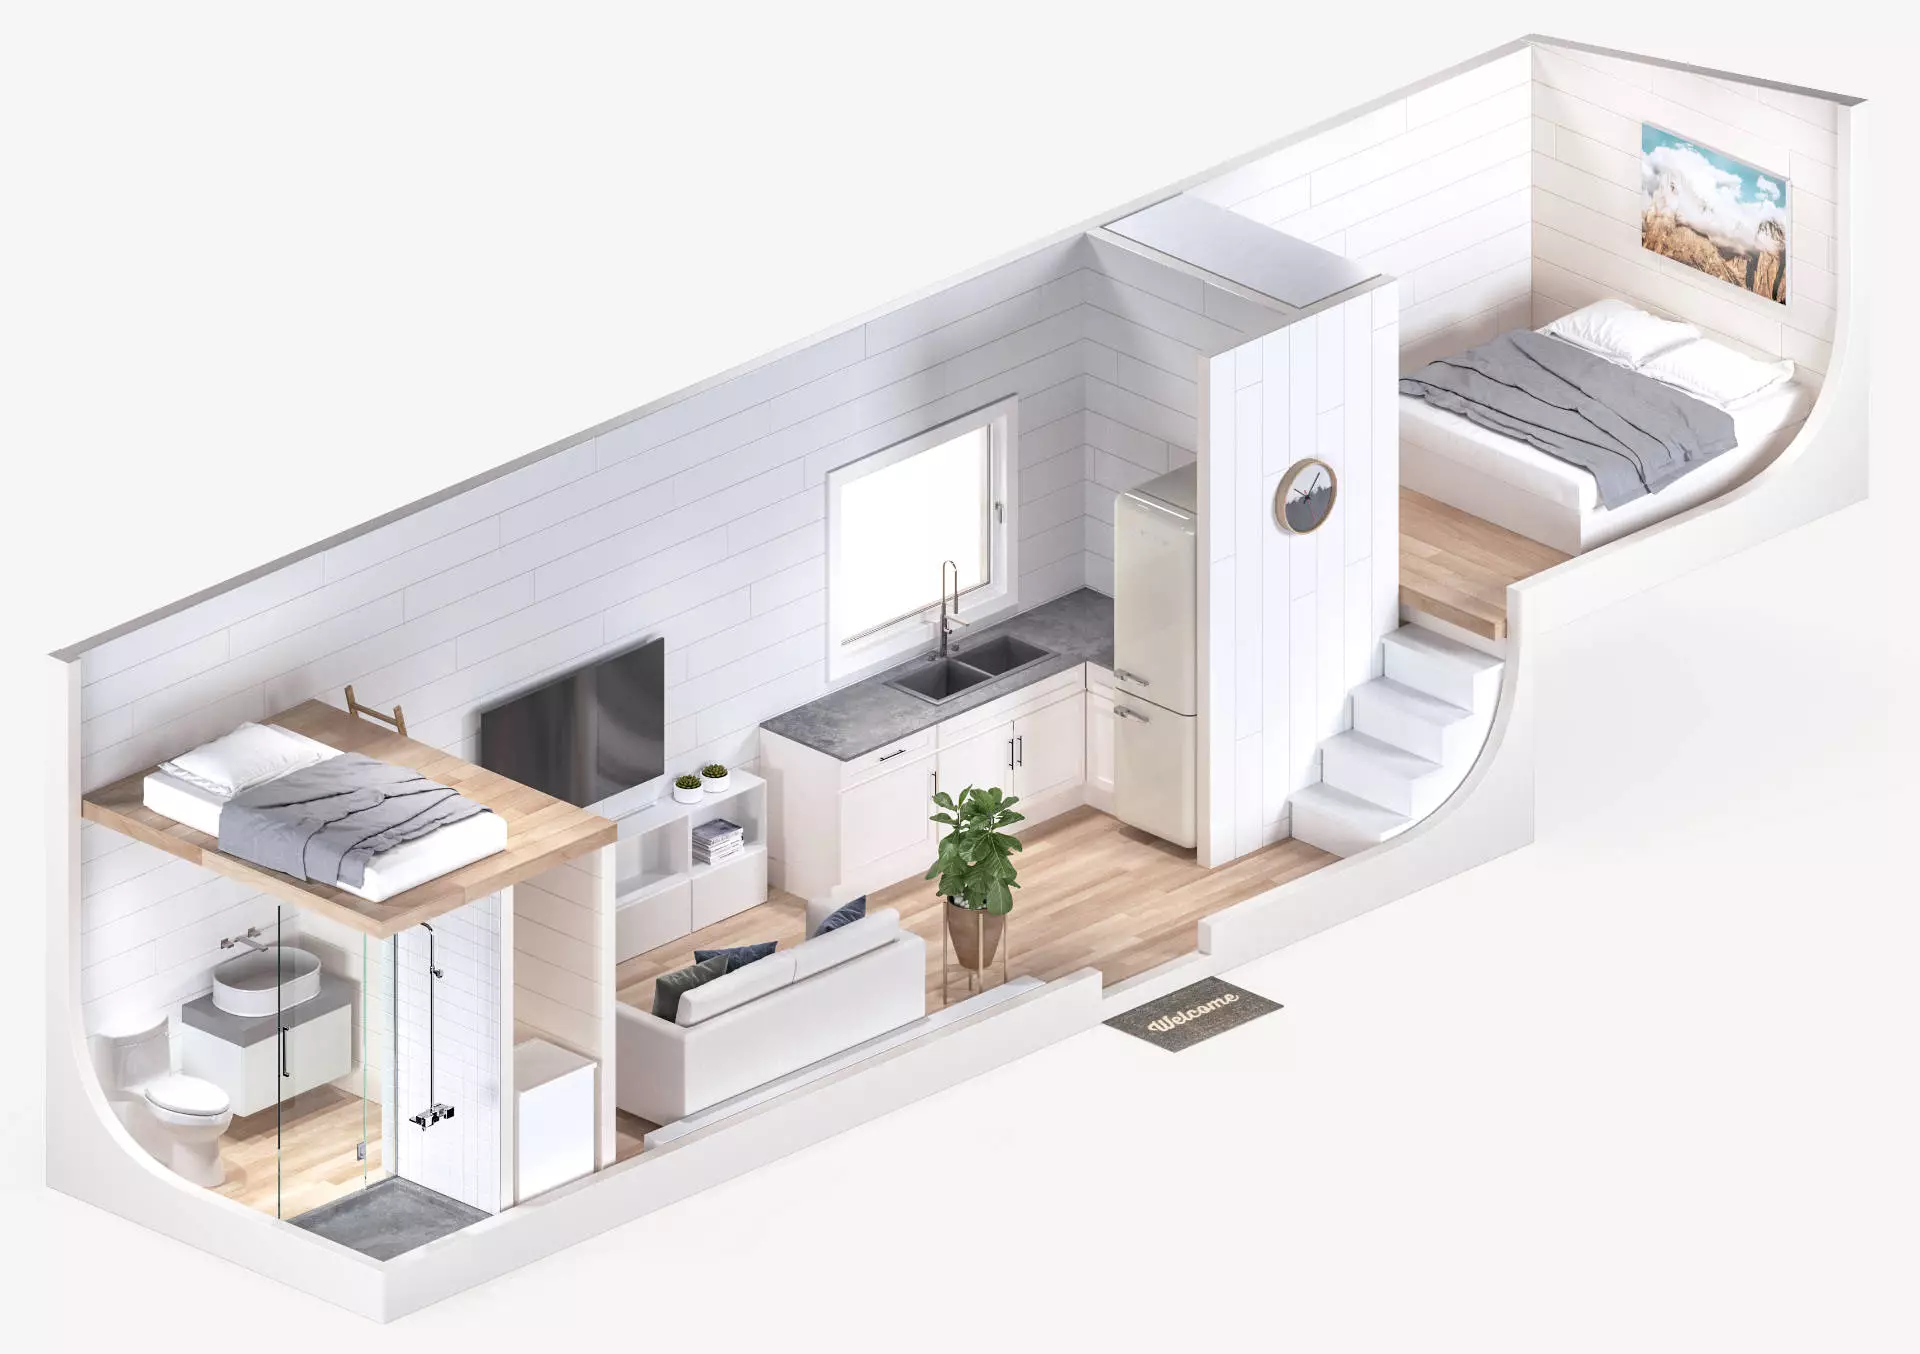
Let’s be honest. When you dream of building a tiny house or an Accessory Dwelling Unit (ADU), you’re picturing the sleek loft, the clever storage, the minimalist lifestyle. You’re probably not lying awake at night dreaming about drain vents and PEX tubing runs. But here’s the deal: the success of your small-space living hinges on the systems hidden behind those beautiful walls. And plumbing is arguably the most critical.
Get it wrong, and you’re facing leaks, clogs, and a world of costly, invasive repairs. Get it right, and you enjoy reliable, efficient water service for years. This guide dives into the unique plumbing considerations for tiny homes and ADUs, blending practical advice with some essential “lessons learned the hard way” from builders in the trenches.
The Core Challenge: Space, Scale, and Codes
It’s not just about shrinking a big-house system. Tiny home and ADU plumbing requires a different mindset. Every inch counts, and the margin for error is, well, tiny. You’re balancing three things: local building codes (which absolutely apply to ADUs and, increasingly, to wheeled tiny homes on foundations), the physical constraints of your footprint, and your own daily water needs.
1. The Hot Water Dilemma: Tank vs. Tankless
This is one of the first big decisions. A traditional water heater tank can swallow precious closet space. A tankless (on-demand) unit is compact and mounts on a wall, saving floor space. It also provides endless hot water—great for back-to-back showers. But—and it’s a big but—tankless heaters require a significant burst of gas or electricity to fire up. You must ensure your utility hookups can handle the demand.
For off-grid tiny homes, a small point-of-use electric tank under the sink might be the smart play for the kitchen. Honestly, many builders use a hybrid approach: a small tankless unit for the main shower/sink, and a tiny point-of-use heater for the kitchen to avoid waiting for hot water to travel across the house.
2. Pipe Material Matters More Than You Think
Copper is durable but expensive and requires soldering. PVC for drains is standard. But in tight spaces, the flexibility of PEX (cross-linked polyethylene) tubing is a game-changer. It’s like the difference between routing a stiff garden hose and a bendable drinking straw through a maze. PEX can curve around corners, reducing the need for fittings and potential leak points. It’s also freeze-resistant to a degree, which is a genuine concern for four-season tiny homes on wheels.
Layout Strategy: The “Wet Wall” Concept
This is non-negotiable for efficiency. Cluster all your plumbing fixtures—kitchen sink, shower, toilet—along one or two shared walls. This creates a “wet wall” or “plumbing wall” where all supply lines and drain pipes are stacked and centralized. The benefits are massive:
- Saves Materials: Shorter pipe runs mean less money spent on tubing and fewer joints.
- Easier Insulation: You can focus your freeze-protection efforts on one core area.
- Simplifies Access: If there’s ever a problem, you likely have one strategic access panel to open, not three.
Imagine trying to run pipes to fixtures on opposite ends of a 24-foot trailer. You’d waste space, increase heat loss, and create a nightmare for maintenance. Just don’t do it.
Drainage and Venting: The Invisible Essentials
This is where DIYers often get tripped up. Drain pipes need to slope consistently (usually 1/4″ per foot) to let gravity do its job. In a tiny home on a trailer, with a floor just inches off the axles, creating that slope for a toilet drain can be a geometric puzzle. That’s why you often see tiny house toilets mounted on a raised platform—it’s not just for style, it’s to create the necessary fall for the waste pipe.
Then there’s venting. Every drain needs a vent pipe to prevent sewer gases from entering and to allow wastewater to flow smoothly. Vents usually exit through the roof. In an ADU, you’ll tie into existing home vents or run a new one. For a tiny house, a clever solution is an Air Admittance Valve (AAV). This one-way valve lets air in when needed but doesn’t let smells out, and it can be installed under a sink, eliminating a roof penetration. Check your local codes though; some jurisdictions don’t allow AAVs, or have specific rules for them.
Water Supply & Conservation: Thinking Small
Your water source dictates a lot. For a permitted ADU, you’ll typically tee off the main house’s supply. For a mobile tiny home, you have a fresh water inlet for hose hookup. And here’s a key trend: more people are installing integrated RV-style water stations on the exterior. These panels combine the fresh water inlet, city water connection, water pump switch, and even outdoor shower hookup in one neat, weatherproof box.
Conservation isn’t just eco-friendly; it’s practical. Smaller water tanks (if you have them) fill faster and last longer. Low-flow fixtures are a must:
| Fixture | Smart Choice for Tiny Living |
| Showerhead | 1.5 GPM (Gallons Per Minute) or less |
| Faucet Aerator | 1.0 GPM |
| Toilet | Dual-flush or efficient composting/incinerating toilet |
Special Systems: Off-Grid & Alternative Options
Not tying into municipal sewer? You have choices, each with pros and cons.
- Composting Toilets: The gold standard for mobile tiny homes. No water needed, no black tank to empty, just… well, compost. They require power for a fan and occasional maintenance. The mental hurdle is bigger than the practical one for most folks.
- Incinerating Toilets: Burns waste to ash using electric or gas. Extremely effective, but power-hungry.
- Greywater Systems: Water from your sink and shower can be filtered and reused for irrigation (where legal). In a tiny setup, this might just be a simple diverter valve to a mulch basin. It reduces your overall water footprint significantly.
Freeze Protection & Insulation: A Non-Negotiable
If your tiny home or ADU will experience freezing temperatures, this isn’t optional. Pipes in exterior walls are vulnerable. The best strategy? Keep plumbing in conditioned space. Insulate your underbelly and your “wet wall” aggressively with spray foam or high-R-value batts. For ADUs, consider adding heat tape to vulnerable pipes—it’s a wire that provides just enough warmth to prevent freezing. For mobile tiny homes, you can install a small, thermostatically-controlled space heater in the utility bay for extreme cold snaps.
Final Thoughts: Plan, Then Plan Some More
Look, the charm of tiny living is in the simplicity. But that simplicity on the surface requires thoughtful complexity behind the scenes. Before you frame your first wall, have a detailed plumbing diagram. Know where every pipe, valve, and drain will go. Consult a professional if you’re unsure—even an hour of a plumber’s time during the planning phase can save you thousands later.
In the end, great plumbing is invisible. It’s the quiet confidence that when you turn the knob, hot water arrives. That when you flush, everything disappears as it should. It’s the foundation for a comfortable, resilient small home that doesn’t just look good on Instagram, but works flawlessly day after day. And that peace of mind? Honestly, it’s worth every bit of the upfront headache.