
 Regina Wang
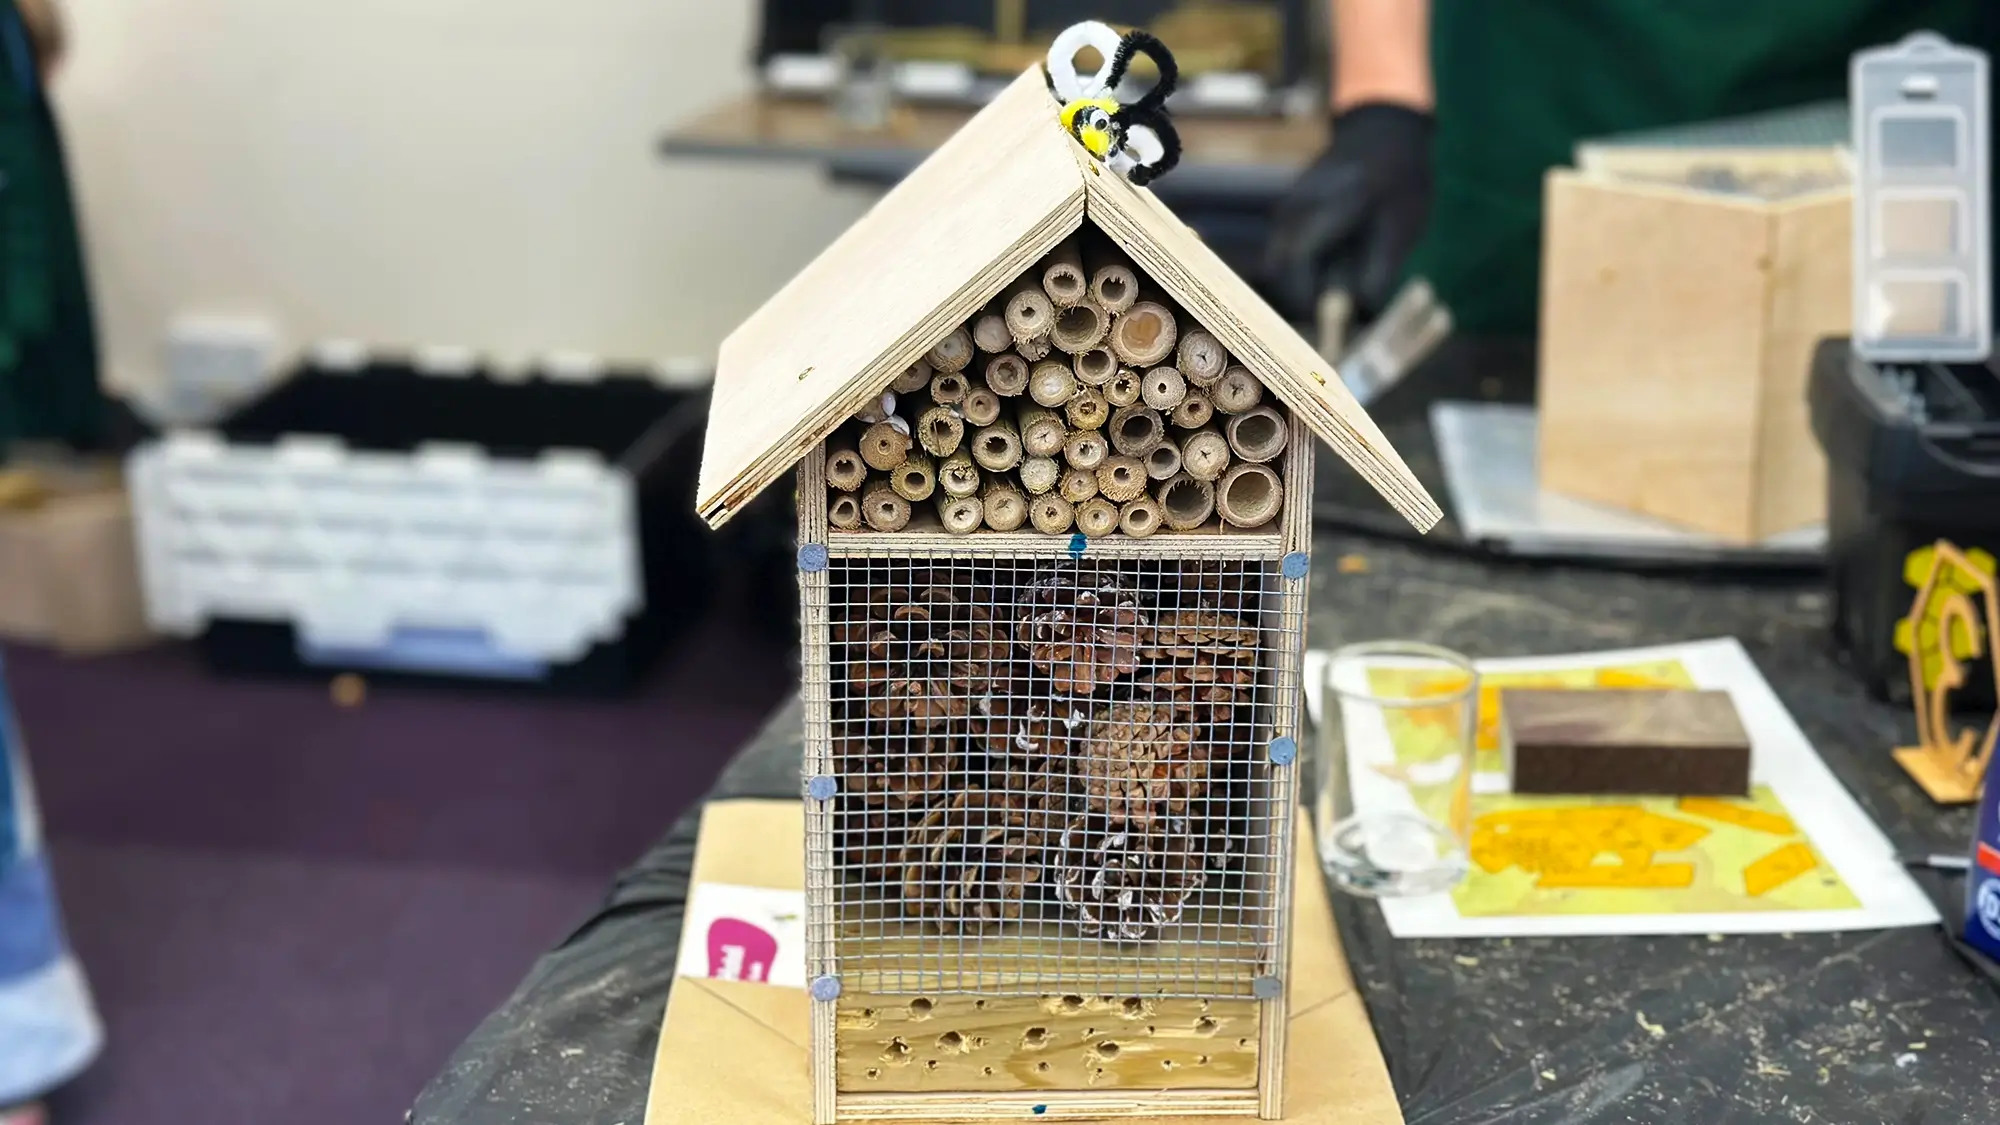
Let’s be honest. A perfectly manicured lawn is a bit of a wildlife desert, isn’t it? It’s quiet. Too quiet. What’s missing are the gentle buzzes, the rustles in the leaf litter, the evening chorus of frogs. The good news? You can change that. And you don’t need a wilderness estate to do it.
By building simple habitat structures, you can roll out the welcome mat for nature’s most helpful critters: pollinators like solitary bees, pest-controlling insects, and amphibians that keep mosquito populations in check. It’s about giving them a place to live, hide, and raise their young. Here’s how to get started.
Why Bother? The Unsung Heroes in Your Garden
Well, for starters, these creatures work for free. Beneficial insects are your frontline defense against aphids, caterpillars, and other plant-munchers. Amphibians, like toads and frogs, are insatiable predators of slugs, snails, and insects. And pollinators? Well, we all know how crucial they are.
But habitat loss is a real pain point, even in suburban areas. A tidy garden often removes the very things these animals need: dead wood, bare soil, piles of stones, and quiet, damp corners. Building targeted structures is like offering a tiny apartment complex in a neighborhood that’s been bulldozed. It makes a tangible difference.
Structures for the Insect Allies
The Bug Hotel: A High-Rise for Helpers
You’ve probably seen these. The key is to think of them not as decorative ornaments, but as functional housing. Different materials attract different tenants.
- Hollow stems & reeds: Bundle them together and place them in a sheltered spot. These are perfect nesting tubes for solitary bees—which are non-aggressive super-pollinators.
- Drilled wood blocks: Take a block of untreated wood and drill holes of varying diameters (2mm to 10mm) but not all the way through. This mimics beetle burrows and bee nesting sites.
- Pine cones, bark, and straw: Stuff these loosely into compartments. They provide overwintering shelter for ladybugs, lacewings, and other predatory insects.
Place your bug hotel facing south or southeast, off the ground, and somewhere it won’t get soaked by rain. And be patient—it can take a season or two for word to get around the insect community.
The Simple Soil Bank: Ground-Nesting Bee Real Estate
Many native bees don’t live in hives or tubes. They nest in the ground. You can help by creating a bare soil bank—a small, sunny slope of exposed, loosely packed, well-drained soil. Avoid tilling it. Just let it be. It’s a low-effort, high-reward project that provides essential ground nesting bee habitat.
Welcoming Amphibians: Cool, Damp Havens
Frogs, toads, and newts need two things: water for breeding and damp, safe places to hide. A pond is the ultimate magnet, but not everyone can dig one. That’s where clever structures come in.
The Toad Abode (It’s Simpler Than It Sounds)
A toad can eat thousands of garden pests in a single season. To invite one in, you need a DIY toad house. Honestly, it can be as simple as an overturned clay pot with a cracked edge for an entrance, partially buried in a shady, moist garden bed. Or, use a chunk of old drainage pipe buried at an angle.
Place it near a water source if you can—a small dish sunk into the ground works—and forget about it. Toads appreciate the privacy.
The Rock & Log Pile: A Condo Complex for Cold-Blooded Neighbors
This is one of the most effective things you can do. Don’t just stack things neatly. Toss logs, larger branches, and medium-sized rocks into a pile in a shady, low-traffic corner. The goal is to create deep, cool crevices and cavities that retain moisture.
This pile becomes a hub for amphibians, overwintering insects, spiders, and even small reptiles. It’s a living, breathing structure that decomposes and changes over time, which is exactly what you want.
Location, Location, Location: Siting Your Structures
You know, you can build the most beautiful bug hotel, but if you put it in the wrong spot, it’ll stay empty. Think like your guest.
| Structure Type | Ideal Location | Key Consideration |
| Bug Hotel / Bee House | Sunny, south-facing, sheltered from strong winds and heavy rain. At least 3-4 ft off the ground. | Morning sun is crucial for warming cold-blooded insects. |
| Soil Bank | Full sun, on a slope to ensure drainage. Undisturbed. | Must remain bare and un-mulched. A little sand mixed in helps. |
| Toad House / Rock Pile | Shady, cool, and damp. Near ground cover or a garden bed. Close to a water source is a huge plus. | Think “damp cellar,” not “sunny patio.” Ensure a clear, safe path to moisture. |
Materials Matter: What to Use and What to Avoid
This isn’t a place for treated lumber, pesticides, or plastics. Stick with natural, untreated materials:
- Yes, please: Untreated wood, terracotta, bamboo canes, hollow plant stems, stones, old bricks, pine cones, dry leaves, straw.
- Avoid completely: Pressure-treated wood, varnished wood, plastic netting (can entangle), glossy materials, any item treated with chemical preservatives.
The Long Game: Patience and a Bit of Messiness
Building the structure is just the first step. The real work is… well, not working. It’s about letting go. Don’t tidy up the fallen leaves around your toad abode. Don’t fret over a little moss growing on your bug hotel. This “mess” is the habitat.
Check your structures occasionally for unwanted guests—like invasive paper wasps building nests in bee tubes—but otherwise, let nature take its course. It will. In fact, the first time you see a mason bee moving into a tube, or spot a toad peeking out from under your handmade roof, you’ll feel a quiet thrill. It’s a connection. A small, positive intervention in a world that often feels disconnected from the wild.
You’re not just building a pile of sticks and stones. You’re building a neighborhood. And you’re filling it with some of the best, most productive neighbors you could ever hope for.