
 Regina Wang
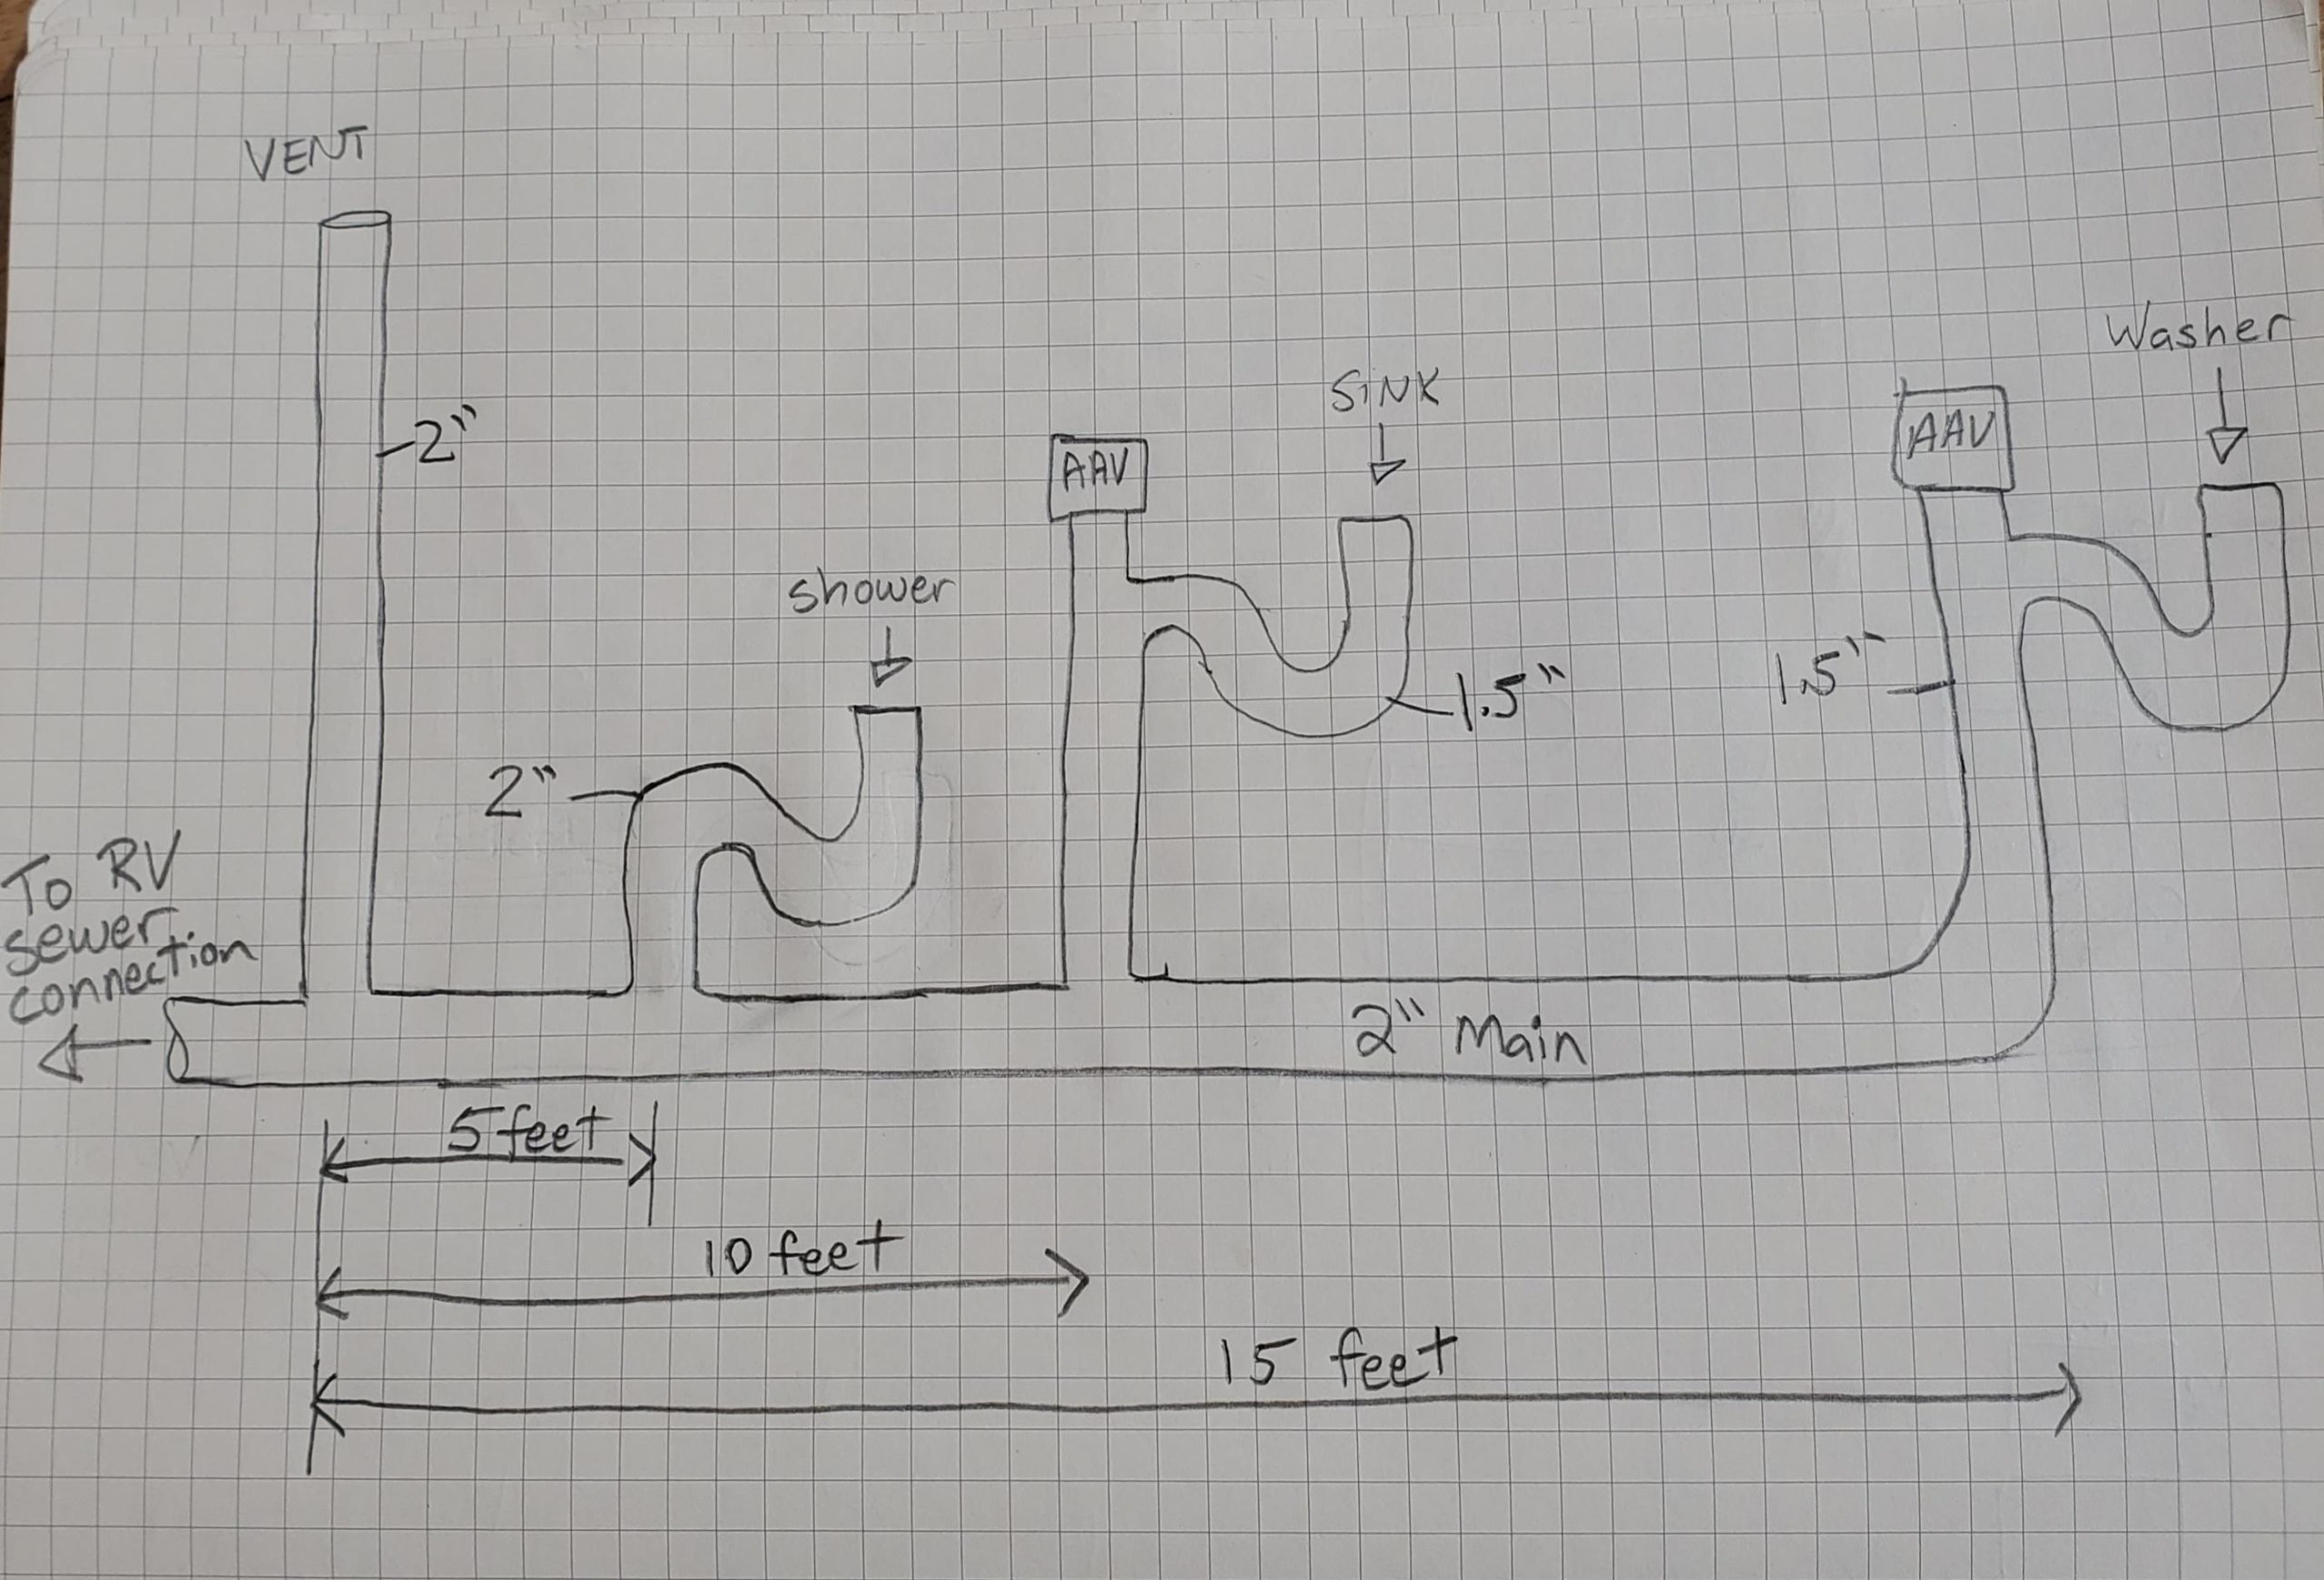
So, you’re thinking about joining the small living movement. Maybe it’s a tiny house on wheels, ready for adventure. Or perhaps it’s an ADU (Accessory Dwelling Unit) in the backyard—a rental opportunity, a space for family, a personal studio. Honestly, it’s an exciting prospect.
But here’s the deal: the plumbing in these compact spaces is a whole different beast compared to a standard single-family home. You can’t just shrink a conventional system and expect it to work. Every inch, every gallon, every pipe run matters immensely. Get it wrong, and you’re facing big headaches in a very small space.
Let’s dive into the essential plumbing considerations for tiny homes and ADUs. We’ll talk about the big decisions, the space-saving tricks, and the common pitfalls to avoid. Think of it as plumbing, but with a minimalist, puzzle-solving twist.
The Big Question: On-Grid vs. Off-Grid Plumbing
This is your foundational choice. It dictates everything that follows. Are you connecting to municipal services, or are you going fully self-reliant?
Going On-Grid (The ADU Standard)
For most ADUs, you’re tapping into the main house’s water and sewer lines. This is often the simplest path, but it’s not without its hurdles.
- Tapping In: You’ll need to run new water supply lines and a sewer line from the main house. This means trenching. The depth is critical, especially for the sewer line, to maintain proper slope and prevent freezing.
- Permits, Permits, Permits: This is non-negotiable. Your local building department will have specific requirements for ADU connections. Skipping this step is a recipe for legal and functional disaster.
- Pressure and Flow: Check if your existing main water line has enough capacity to supply both the primary house and the new ADU without a drop in pressure. You might need to upgrade.
Embracing Off-Grid (The Tiny House Dream)
For tiny homes on wheels or in remote locations, off-grid plumbing is the name of the game. It offers freedom but demands more management.
- Water Supply: This typically means a freshwater tank. Size matters—a 40-gallon tank feels very different for one person versus a family of three. You’ll need a 12v or 110v water pump to create pressure.
- Wastewater: This is the real challenge. You have two streams to manage:
- Graywater: From sinks and showers. Some places allow you to divert this to irrigation (with eco-friendly soaps!), but regulations vary wildly.
- Blackwater: From the toilet. This almost always goes into a holding tank. Which brings us to the next big decision…
The Toilet Conundrum: Choosing Your Throne
Your toilet choice is a major commitment in a tiny space. It impacts smell, space, maintenance, and your overall comfort. Let’s break down the options.
| Type | How It Works | Pros | Cons |
|---|---|---|---|
| Composting Toilet | Separates liquid and solid waste. Solids decompose into compost with a fan-assisted system. | No water usage. No blackwater tank. Creates usable compost. | Requires regular maintenance (emptying, adding bulking material). Needs power for the fan. Can have a learning curve. |
| Cassette Toilet | Like an RV toilet. Waste goes into a small, removable cartridge (“cassette”) you empty into a dump station. | Compact. Simple mechanism. No need for a large, permanent blackwater tank. | Requires frequent emptying (every few days with full-time use). Handling the cassette can be… an intimate experience. |
| Incinerating Toilet | Burns waste into a small amount of ash using electric or gas heat. | Virtually no waste to dispose of. Very sanitary. | Extremely high energy consumption. Expensive upfront cost. |
| Standard Flush (Low-Flow) | Connects to a septic or sewer system, just like a regular toilet. | Familiar and convenient. Best for on-grid ADUs. | Requires a full plumbing hookup and significant water. Not an option for off-grid. |
For most mobile tiny homes, the composting toilet is the gold standard. It’s a mindset shift, for sure, but it solves the blackwater problem elegantly. For ADUs, a standard low-flow toilet is usually the way to go.
Space-Saving Plumbing Layouts and Materials
In a tiny home, the plumbing layout isn’t just about function; it’s an art form. The goal is to conserve space and minimize heat loss.
The Magic of a “Wet Wall”
This is your number one strategy. A wet wall is a single interior wall where you concentrate all your plumbing fixtures—shower, toilet, sink. By stacking the supply lines and drains, you minimize the length of pipes running through your home. This saves space, reduces material costs, and makes the system more efficient. It’s like creating a plumbing super-highway instead of a bunch of winding country roads.
PEX is Your Best Friend
Forget rigid copper or CPVC for supply lines. PEX (cross-linked polyethylene) tubing is flexible, easy to install, resistant to freezing (it can expand and contract without bursting), and cheaper. You can run long, continuous lines with fewer fittings, which means fewer potential leak points. For a tiny home, especially one on a chassis that will flex and move during transport, PEX is basically a requirement.
Insulation is Non-Negotiable
Every single inch of pipe, both hot and cold, needs to be insulated. In a small, well-insulated shell, a burst pipe isn’t just a leak—it’s a catastrophe. Pipe insulation is cheap and easy to install. It prevents heat loss from your hot water lines (so you get hot water faster) and, crucially, it protects against freezing in cold climates.
Hot Water on Demand: Think Small and Efficient
You don’t need a 50-gallon water heater taking up precious closet space. The tiny home and ADU market is perfect for compact, on-demand systems.
- Tankless Water Heaters: These are the champions of small-space living. They heat water instantly as it flows through the unit, providing endless hot water in a box the size of a small suitcase. They can be gas (propane or natural gas) or electric. Electric models require a significant power draw, so make sure your electrical system can handle it.
- Point-of-Use Water Heaters: These are even smaller tankless units designed for a single fixture, like under a kitchen sink. They’re perfect for ensuring instant hot water at your most-used faucets without running a long hot water line.
- Small Hybrid Water Heaters: For an all-electric ADU, a small, heat-pump hybrid water heater can be incredibly efficient, though they do take up more space than a tankless model.
A Few More Pro Tips and Pitfalls
Alright, let’s wrap up with some scattered-but-important wisdom.
- Access Panels: Plan for access! You will need to get to your valves, pumps, and connections eventually. Build removable panels or use cabinets with easy access to the plumbing behind them.
- Slope Your Drains Correctly: This is plumbing 101, but it’s even more critical in a tight space. Drains need a consistent downward slope (usually 1/4 inch per foot) to function properly. Not enough slope, and waste sits. Too much slope, and water runs away faster than the solids.
- Venting is Vital: Plumbing drains need vent pipes to allow sewer gases to escape and to let water flow smoothly. In an ADU, you’ll tie into the main house’s vent stack. In a tiny house, you might use an Air Admittance Valve (AAV)—a one-way valve that lets air in but not out—which can be a space-saving solution where a full vent stack isn’t possible.
- Consider the Freeze: If your tiny home will experience freezing temperatures, you need a plan. For off-grid homes, this means either adding RV-style tank heating pads or, more drastically, fully winterizing and draining the system if you won’t be using it.
Building small forces you to think big about the essentials. Your plumbing system is the circulatory system of your home—it needs to be robust, efficient, and perfectly sized for the body it serves. By making informed choices early on, you can ensure that your tiny home or ADU isn’t just a symbol of simplicity, but a masterpiece of functional, comfortable living.